

Showstopper hoppers with curries and sambols: O Tama Carey’s Sri Lankan spread – recipe
Source:Theguardian
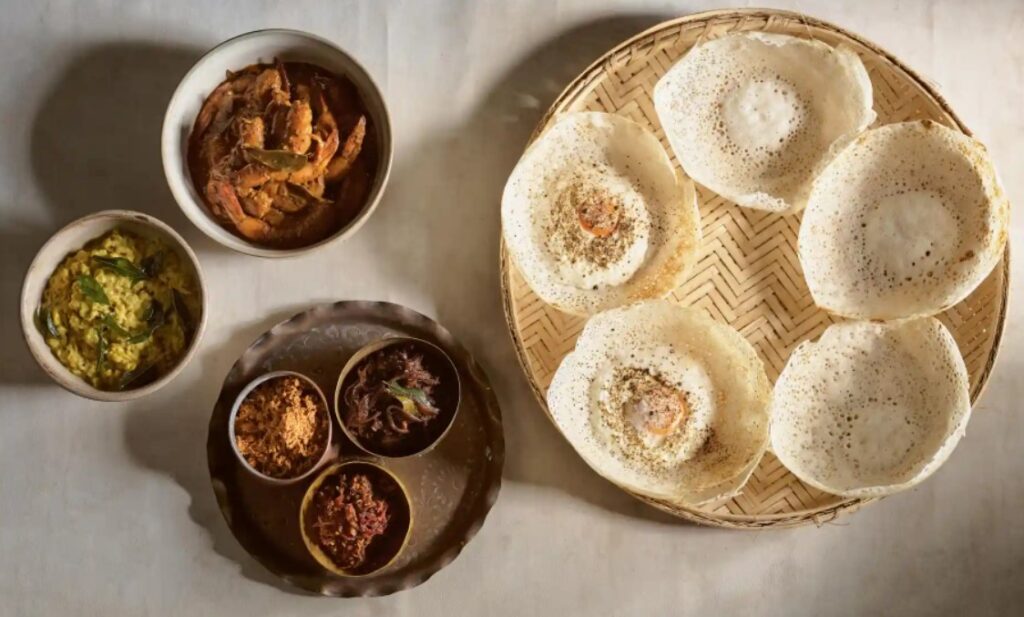
The chef and owner of Lankan Filling Station shares her recipe for the intricate dish that made her famous, served with a big mixed plate of prawn curry, simple dal and sambols
My love of hoppers is a well-established fact. Long before I opened Lankan Filling Station, every trip to Sri Lanka inevitably turned into a mini hopper pilgrimage. I watched them being made, I questioned their makers and occasionally someone would let me on to their pans to attempt a hopper swirl.
Despite this borderline obsession, I had only really tried to make them from scratch once, with my nan in Perth. On reflection, it might have been a good idea to nail a recipe before committing to opening a restaurant.
When it came time to make my own recipes for LFS (or The Hopper Shop, as it was known then), the first test was with an instant hopper mix; they actually weren’t too bad, which was encouraging. I then tested version after version, until we finally settled on our current recipe.
Once I had conquered the recipe, we set up a market stall, our first foray into actually cooking and selling hoppers to real people. It was a nice easy entry; the hoppers came out well and we probably only made about 50 over a few hours.

However, this was closely followed by one of the worst kitchen experiences of my life.
Half an hour before opening a pop-up at a friend’s bakery, with a queue of about 40 people out the front, we started to test the batter. The hoppers weren’t coming out very well and a lot were sticking. Then two of our six burners decided not to work, closely followed by a third. Meanwhile, more and more people were joining the queue. There was a sense of doom in the air when it was time to open the doors.
It was like a bad dream. We were managing about one good hopper from every three, and even they were slow going. The last batch of people to arrive didn’t even get one hopper.
We had already committed to doing it again, so we had to pull ourselves together. We got some better burners (ones that actually worked) and some non-stick pans (up until then I’d been using traditional aluminium ones that need to be seasoned correctly with perfect batter to work). I looked at the batter recipe, which for some reason I’d tried to tweak, and went back to the original. We made it through, much more successfully, but the fear of that first night will always stay with me.

To get consistency now, we ferment our hopper batter slowly in the fridge. Apart from the occasional rogue dough, it behaves itself these days.
Here’s a set of recipes for a traditional hopper meal, which works for breakfast or dinner. To enjoy, tear, dip, and scoop your hopper into the yolk, the various curries, and sambols. Use it in the same way you would a roti or bread.
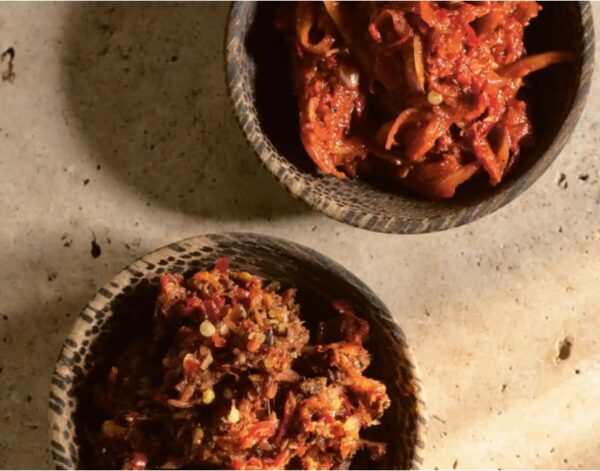
Prawn curry
I have often found that the time it takes a prawn to absorb enough flavour from a curry sauce does not tally with its optimal cooking time. At LFS we get around this by making the curry base and letting it cool, then adding the prawns and letting them have a good soak in the sauce overnight. From there it’s just a matter of cooking them briefly the next day.
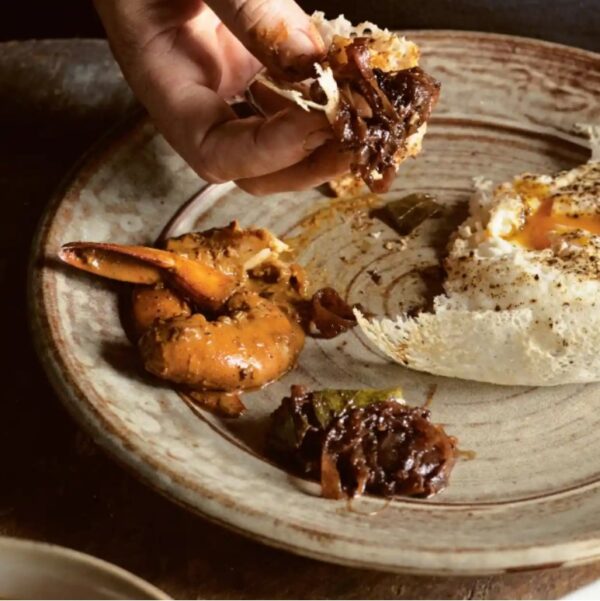
Prawn curry – shown here with a variety of other accompaniments to O Tama Carey’s hopper. Photograph: Anson Smart
For the curry powder
5g curry leaves
24g sweet paprika
20g chilli powder
20g coriander seeds
15g white peppercorns
13g chilli flakes
12g cumin seeds
10g cardamom seeds
8g fennel seeds
8g cinnamon quill, roughly crushed
7g turmeric powder
5g fenugreek seeds
3g cloves
3g star anise
For the curry
50g ghee
10g curry leaves
350g sliced red onion, sliced
35g garlic, finely chopped
25g ginger, finely chopped
25g finely chopped lemongrass, white part only
6 red bird’s eye chillies, finely chopped
Freshly ground white pepper
115g red curry powder, recipe above
600ml coconut cream
5 x 5cm pieces pandan leaf
60g tamarind concentrate
150g coriander, well washed, leaves picked, stems and roots finely chopped
800g medium cleaned prawns, peeled and deveined, tails intact
Salt flakes
Juice of 1–2 limes
To make the curry powder, place the curry leaves in a frying pan over a medium-high heat and cook gently for about two minutes. Reduce the heat a little and cook for another one to two minutes until they are dry and toasted, but not browned.
Allow the leaves to cool completely, then combine them with the remaining spices and grind to a fine powder. Any left over can be stored in an airtight container.
To make the prawn curry, melt the ghee in a medium saucepan over a medium heat, then add the curry leaves and cook, stirring, for a minute or so until the leaves are fried. Add the onion, garlic, ginger, lemongrass and chilli and cook, stirring occasionally, for six to seven minutes, until the onion has softened. Lightly season with pepper.
Add the curry powder and cook, stirring, for one to two minutes until it begins to catch on the bottom of the pan.
Add the coconut cream, pandan leaf, tamarind and 600ml water and stir well. Reduce the heat to low and gently simmer, stirring occasionally, for 10 to 12 minutes until the sauce has reduced and thickened. Stir in the coriander stem and root.
Allow your curry base to cool completely, then mix in the prawns. Transfer to an airtight container and place in the fridge overnight.
When you are ready to finish cooking the curry, remove it from the fridge – it will have thickened considerably. Scoop it into a medium saucepan and gradually bring to a simmer over a gentle heat, stirring every now and then.
Once the sauce starts to simmer, season to taste with salt and more pepper if needed. Cook the prawns until they are just cooked, about nine to 12 minutes, depending on their size. The curry will have quite a lot of thick sauce, very hot and sour, but you should be able to detect the sweetness of the prawns. Season to taste with a little lime juice before serving.
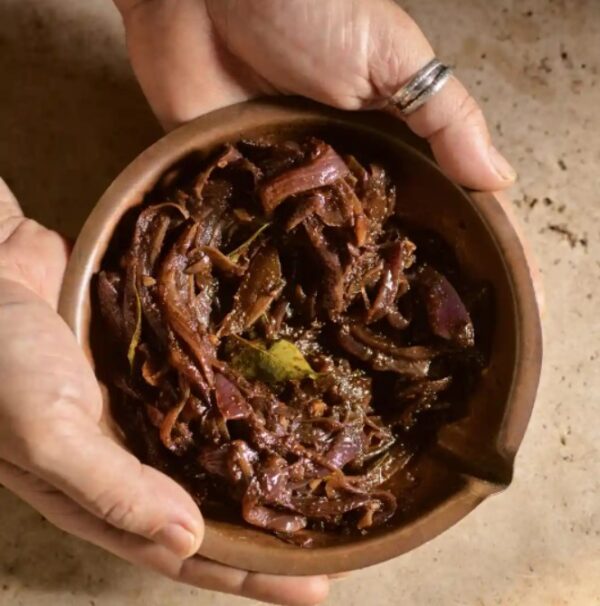
Dal
A good dal is a thing of beauty and comfort. This dal is based on the recipe my mum taught me: creamy, mild and very savoury, this is exactly the way we cook it at the restaurant.
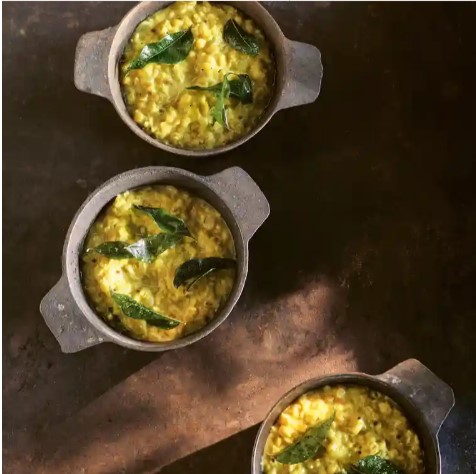
‘A thing of beauty and comfort’: O Tama Carey’s dal Photograph: Anson Smart
Serves 4–6
75g coconut oil
5g curry leaves
550g brown onions, cut into medium dice
18g garlic, finely chopped
15g ginger, finely chopped
Salt flakes and freshly ground black pepper
7g black mustard seeds
5g turmeric powder
1 cinnamon quill
4 x 5cm pieces pandan leaf
Bottom 5cm of 1 lemongrass stem, lightly bruised
525g red lentils, thoroughly washed
450ml coconut cream
Melt the coconut oil in a medium saucepan over a medium heat. Add the curry leaves and cook, stirring, for a minute or so until the leaves are fried. Add the onion, garlic and ginger and cook, stirring occasionally, for six to seven minutes until the onion has softened. Lightly season with salt and pepper.
Add the mustard seeds, turmeric and cinnamon and cook, stirring, for one to two minutes until the turmeric begins to catch on the bottom of the pan.
Add the pandan leaf, lemongrass and lentils and give everything a good stir to combine.
Pour in the coconut cream and 1 litre of water and mix well, then reduce the heat to low and simmer gently for 10 to 15 minutes, stirring occasionally. The dal is ready when all the lentils have just given away and turned yellow, while still retaining a little texture. Reseason with salt and pepper and serve hot.
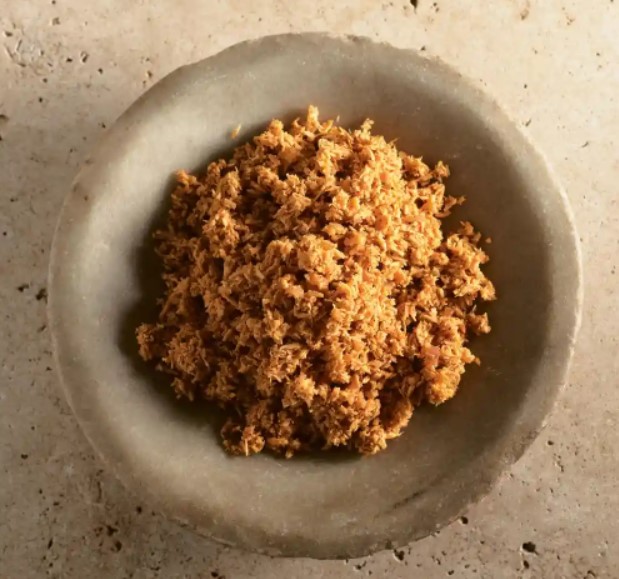
Pol sambol
Meaning coconut sambol, this is ubiquitous in Sri Lanka. During any given day on the island, you would be hard pressed to not eat a version of it at some stage. This recipe makes more than you need for an average meal (about 450g) but it will keep for a good week in the fridge and is delicious on many things. I like it on toast with butter, particularly if there is a poached egg involved.
Serves 8–10
300g grated coconut
100g shallot, finely sliced
3 small green chillies, finely chopped
20g Maldive fish flakes, ground
5g chilli powder
3g black pepper, freshly ground
3g sweet paprika
Juice of 1–2 limes
Salt flakes
Place all the ingredients, apart from the lime juice and salt, in a bowl and firmly mix them together with one hand, using a squeezing and kneading motion. This not only combines the ingredients, it also helps release the oils from the coconut. Keep going until the texture of the sambol is almost a little sticky.
Season to taste with lime juice and a generous amount of salt, mixing and squeezing again. Serve at room temperature.
Lunu miris
This version is paste-like and slightly fiery, with an extra punch from the Maldive fish flakes. Not for the faint-hearted.
22g Maldive fish flakes
4g chilli flakes
4g salt flakes
3 long red chillies, cut into thin rounds
70g shallot, finely sliced
3g black pepper, freshly ground
4g chilli powder
Juice of 2 limes
Using a mortar and pestle, pound the Maldive fish, chilli flakes and salt until the fish flakes are finely ground.
Add the long red chillies and shallot and pound to a paste-like consistency; it doesn’t have to be super smooth.
Mix through the pepper and chilli powder and season to taste with lime. Serve at room temperature.
Seeni sambol
Along with pol sambol, this is the other sambol found everywhere. The name translates to sugar sambol, but it has the perfect balance of sweet, hot, smoky, sour and umami. It is a great accompaniment to most Lankan meals, particularly egg hoppers, but also anywhere you would want caramelised onion. Because of this versatility and the fact that it keeps well, this is a good one to make in larger batches (this recipe makes just under 800 g). The cooking method is key to get the onions to the right texture – we want them caramelised but still holding their shape with a nice little crunch.
As the name suggests, the spice mix used in it is specifically for making seeni sambol, but it also works well as a fragrant seasoning for meats before grilling.
Serves 10–12
For the spice mix
7g chilli powder
7g salt flakes
3g cinnamon quill, roughly crushed
3g cardamom seeds
3g black peppercorns
1g whole clove (go a little under rather than over with this measure if needed)
For the sambol
50g ghee
1kg red onions, sliced with the grain to a 2 mm thickness
24g garlic, finely chopped
18g inger, finely chopped
8g curry leaves
40g Maldive fish flakes, ground
20g seeni sambol spice mix, recipe above
50g jaggery, chopped
40g tamarind concentrate
Salt flakes
To make the spice mix, combine all the ingredients and grind to a fine powder. Store any left over in an airtight container.
To make the sambol, warm the ghee in a large shallow saucepan over a high heat until it starts to smoke.
Add one-third of the onion, give it a good stir to coat with the ghee, then leave to sit undisturbed for 30 seconds or so. Repeat this method of stirring and sitting for four to five minutes until the onion has softened.
Add half the remaining onion, along with the garlic, ginger and curry leaves, and continue with the stir and sit method for another three to four minutes.
Add the rest of the onion and cook in the same way for another three to four minutes.
Mix in the dried fish and spice mix and stir constantly for one to two minutes to combine well and to make sure the onion doesn’t catch. By now it should be nicely softened and starting to caramelise.
Stir in the jaggery and tamarind. Give these two ingredients time: the jaggery needs to melt and caramelise slightly and the tamarind needs be thoroughly incorporated into the mix.
Cook, stirring, for three to four minutes until the onion mix is dark, caramelised and looking sticky.
Remove from the heat and have a taste; you should only need a bit of salt for seasoning. Set aside to cool and serve at room temperature.
Hoppers
Makes 16–18
To make your own hoppers, you will need hopper pans, available from Sri Lankan or Indian grocers and online. The dough needs to rest overnight so start the recipe a day ahead.
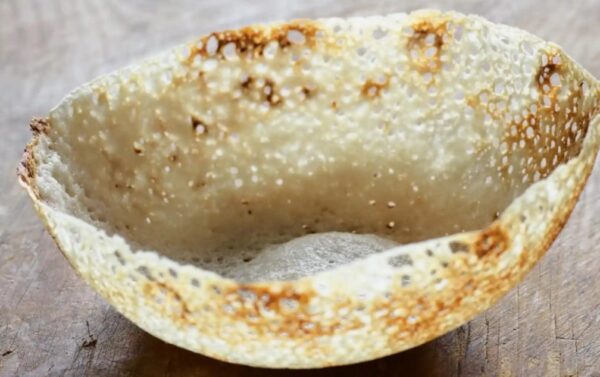
The humble hopper: a labour of love. Photograph: Anson Smart
400g medium coarse rice flour
100g coarse rice flour
11g caster (superfine) sugar
10g dried yeast
7g cooking salt
300ml coconut cream
Eggs, for any egg hoppers
Place the flours, sugar, yeast and salt in a bowl and mix well with your hands. Add 300ml water and combine with your hands to form a dough – it will be a little crumbly and not very sticky. Turn it out on to your bench and knead briefly until it just comes together.
Return it to the bowl, cover with a tea towel and leave the dough to rest at room temperature for two hours.
Wrap the dough or place it in a container with a lid and rest in the fridge overnight.
The next morning, place the dough in a large bowl and whisk in the coconut cream and another 300ml of water to form a batter. Leave at room temperature for one to one-and-a-half hours, until it becomes light and fluffy in texture. The fluffy texture is the key as this indicates fermentation. Once it hits this stage, the batter will last for another few hours, or can even be placed in the fridge and used the next day. At some point, though, the batter will over-ferment and will no longer be any good. You will be able to tell when this happens as the batter will lose its lightness and become very thin.
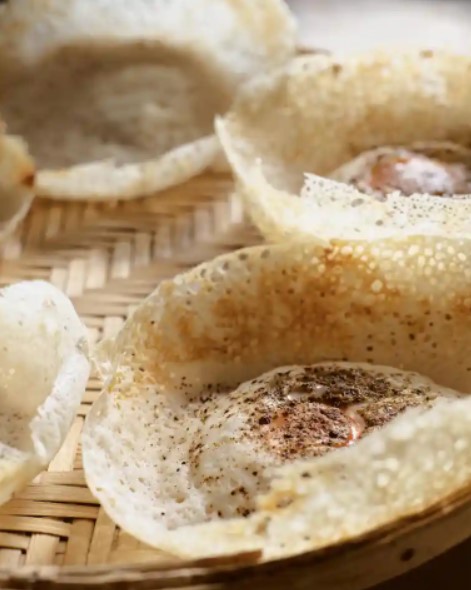
To make egg hoppers, crack an egg into a bowl and pour it into the batter as soon as you have swirled it. Photograph: Anson Smart
To cook your hoppers, heat a hopper pan over a medium heat. Ladle 80ml of batter into the middle of the pan, then use your hands to swirl it around in a circular motion to the top edge. You will know the temperature is right when the batter makes only a very slight sizzle as it goes in and, when you swirl it, it sticks in a nice 1mm layer around the edge of the pan. There should be enough batter to coat the edge and still leave about a tablespoon of batter in the base. If you find you have too much batter, tip a bit out. The hopper batter around the edge should be thin and delicate, and dotted with little lacy holes.
If the pan is too hot, the batter may not stick to the edge as you swirl it, or you may find that it swirls but is very thick. If the pan is not quite hot enough, the layer of batter around the edge will be too fine. You can remedy this by doing a double swirl.
Just accept that you will need to experiment the first few times to get the heat just right.
Once the pan is coated, turn the heat up slightly and cook without the lid until you start to see bubbles forming in the batter puddle on the base. At this point, put the lid on, turn the heat down a little and cook for one minute.
Remove the lid to release the steam and have a look; the extra batter in the bottom should be a little doughy and puffy. Put the lid back on and cook for another minute.
Remove the lid again. To make sure the doughy bit is cooked, test it with your finger: it should be soft and spongy, not wet and sticky.
If it’s not quite cooked, put the lid back on for a moment.
After the lid comes off for the final time, continue cooking the hopper for another minute or so until the outside edge begins to colour and come away from the pan.
Hold the pan with a tea towel and give it a firm tap on the edge to release the hopper a little. Cook for a moment more, then turn out the hopper on to a wire rack. You should be able to remove it just by turning it, but if it’s a little stuck, use a bamboo skewer to help release any caught bits. Let it sit for a moment and then serve immediately. Repeat with the remaining batter.
If you want to make egg hoppers, use the same method but with a tiny bit less batter, as you don’t need any extra pooling in the bottom. Crack an egg into a bowl and pour it into the batter as soon as you have swirled it. Season with salt and pepper or a pepper spice mix and continue cooking as described above. The only difference is that you will need to cook with the lid on for an extra one to two minutes to set the egg.
If you don’t like runny egg yolks, you can give the egg a little whisk before cooking.
-
This is an edited extract from Lanka Food by O Tama Carey, published by Hardie Grant Books (RRP$55).