

Unveiling the World of Resin: A Comprehensive Guide to Crafting with Synthetic Resin – By Malsha – eLanka
Resin, both natural and synthetic, holds a transformative power in the world of crafting. Natural resin, often observed as a tree’s golden tears when wounded, contrasts with its synthetic counterpart, a compound crafted from chemical blends. Synthetic resin, commonly epoxy or casting resin, consists of two liquid components – resin and hardener – which amalgamate to form a solid, glossy finish post-curing, typically spanning 24 to 72 hours.
Distinguishing Epoxy from Casting Resin:
Epoxy resin, a stalwart in the crafting realm, serves primarily as a robust coating, imparting durability and luster to surfaces. Conversely, casting resin, a variant of epoxy, caters to mold-centric creations such as coasters, trays, and jewelry, boasting a longer setting time conducive to intricate designs.
Exploring the Realm of Resin Art:
Resin art, an amalgam of creativity and craftsmanship, finds its essence in utilizing resin – be it epoxy or casting – as a principal medium. From infusing resin with paints or inks to coat paintings for a glossy veneer or casting intricate objects within molds, resin art spans a diverse spectrum, encompassing abstract masterpieces and functional adornments alike.
Crafting with Epoxy and Casting Resin:
Epoxy art employs resin akin to a protective varnish, blending it with paints or alcohol inks or applying it atop finished paintings to bestow a radiant finish. In contrast, casting resin lends itself to mold-bound endeavors, encapsulating creative visions within defined contours.
Embracing the Creative Journey:
Venturing into resin art necessitates specialized supplies and adherence to safety protocols, considering the material’s hazardous nature in its liquid state. Though intricate, resin art beckons with its promise of individual expression and creative fulfillment, beckoning crafters to explore its myriad possibilities.
Materials and Methods:
Essential tools for resin art include resin components, safety gear like gloves and aprons, mixing utensils, and molds for casting resin ventures. Kits offer beginners a comprehensive entry point into the craft, while seasoned artisans might opt for customized supplies to suit their evolving visions.
Unleashing Creativity:
Resin art transcends technical jargon, inviting creators to fashion bespoke works of art that mirror their unique styles and visions. Whether dabbling in abstract realms or crafting functional pieces, the journey of resin art unfolds with endless possibilities, limited only by imagination and adherence to safety guidelines.
In essence, resin art emerges not just as a craft, but as a canvas for personal expression, inviting enthusiasts to explore, create, and revel in the boundless realms of artistic ingenuity.
Techniques and Applications: Resin artists employ various techniques to manipulate this versatile medium and achieve desired effects. Some common techniques include:
- Pouring: Pouring resin onto a flat surface allows artists to create smooth, glossy coatings or vibrant layers of color.
- Swirling: By swirling different colored resin together, artists can create mesmerizing patterns reminiscent of marble or galaxies.
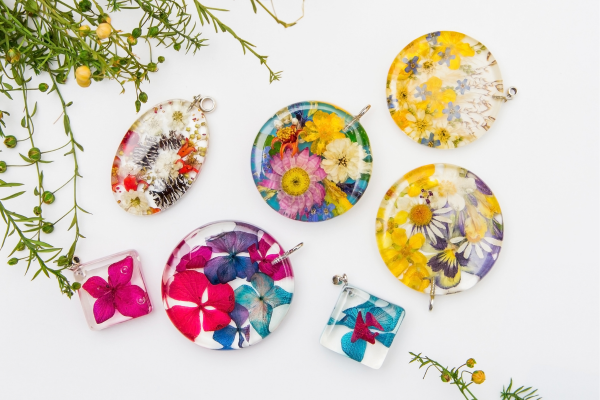
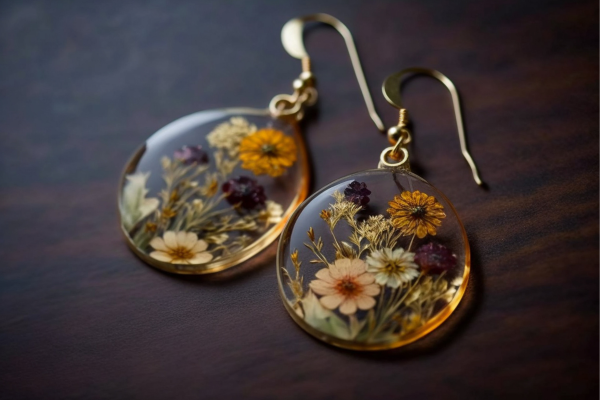
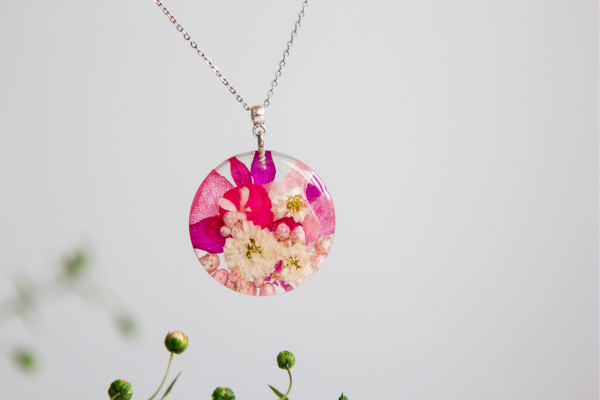
- Embedding: Objects such as dried flowers, leaves, or even small trinkets can be embedded within layers of resin, preserving them in a transparent, glossy finish.
- Resin Casting: Casting involves pouring resin into molds to create three-dimensional shapes, sculptures, or jewelry pieces.
- Resin Painting: Similar to traditional painting techniques, artists can use resin as a medium to create intricate artworks, building up layers of color and texture.
Materials and Safety: Working with resin requires careful consideration of materials and safety precautions. Artists should use high-quality epoxy resin specifically designed for art projects, along with appropriate pigments, dyes, and additives. Ventilation is essential when working with resin, as the curing process releases potentially harmful fumes. Additionally, wearing gloves and protective clothing helps minimize skin contact and exposure.
Challenges and Tips: While resin art offers endless creative possibilities, it also presents unique challenges. Achieving bubble-free, smooth surfaces can be challenging, as air bubbles often form during the mixing and pouring process. To minimize bubbles, artists can use a heat gun or torch to carefully remove them before the resin cures. Additionally, practicing on small-scale projects and experimenting with different techniques can help artists refine their skills and overcome common pitfalls.
The Beauty of Resin Art: What sets resin art apart is its ability to capture light and depth in ways that traditional mediums cannot. The glossy finish of cured resin enhances colors and textures, creating a sense of depth and dimensionality that draws viewers in. Whether it’s a vibrant abstract piece, a delicate floral arrangement encased in resin, or a shimmering seascape frozen in time, resin art has an undeniable allure that continues to captivate audiences around the world.
In conclusion, resin art offers artists a versatile medium for unleashing their creativity and crafting mesmerizing works that push the boundaries of traditional art forms. With its endless possibilities and stunning results, resin art invites us to explore new realms of imagination and expression, making it a truly captivating and enchanting form of artistic expression.
Crafting Resin Art: A Step-by-Step Guide to Unleashing Your Creativity
Resin art, with its mesmerizing depth and glossy finish, offers a captivating avenue for artistic expression. Here’s a comprehensive guide to creating your own stunning resin artworks:
- Step 1: Set Up Your Workspace: Create a well-ventilated workspace with a flat, level surface. Lay down protective coverings such as drop cloths or plastic sheets to prevent any spills or drips. Ensure you have all necessary supplies within reach.
- Step 2: Gather Your Materials: You’ll need epoxy resin (consisting of resin and hardener), safety gear (gloves, apron, respirator, safety glasses), mixing containers, stirring sticks, pigments or dyes, and the surface or molds you’ll be working with.
- Step 3: Prepare Your Surface or Mold: If you’re working on a surface like a canvas, ensure it’s clean and free of dust or debris. If using molds, apply a mold release agent to facilitate easy removal of the cured resin.
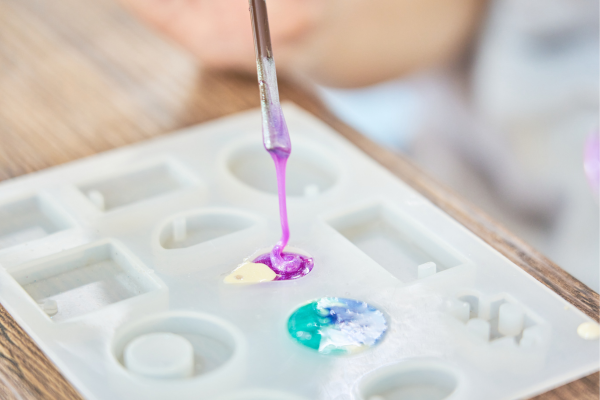
- Step 4: Measure and Mix the Resin: Follow the manufacturer’s instructions to measure the correct ratio of resin to hardener. Pour the resin and hardener into a mixing container and stir thoroughly, ensuring they are fully combined but without introducing too many air bubbles.
- Step 5: Add Pigments or Dyes (Optional): If you desire colored resin, add pigments or dyes to the mixture and stir until evenly dispersed. You can experiment with different colors and effects to achieve your desired aesthetic.
- Step 6: Pour the Resin: Carefully pour the mixed resin onto your prepared surface or into your molds. Use a stirring stick or spatula to spread the resin evenly, ensuring it covers the entire surface or fills the molds completely.
- Step 7: Remove Air Bubbles: To minimize air bubbles trapped in the resin, use a heat gun or torch to gently pass over the surface, causing the bubbles to rise and pop. Be careful not to apply too much heat or hold the heat source too close to avoid damaging the resin.
- Step 8: Add Additional Layers (Optional): For multi-layered artworks, allow the first layer of resin to partially cure before adding subsequent layers. This helps prevent mixing between layers and ensures a smooth finish.
- Step 9: Allow the Resin to Cure: Once you’re satisfied with the appearance of your resin artwork, allow it to cure in a dust-free environment according to the manufacturer’s instructions. Curing times can vary depending on the specific type of resin used and environmental factors such as temperature and humidity.
- Step 10: Finishing Touches: After the resin has fully cured, remove any tape or protective coverings and inspect your artwork for any imperfections. If desired, you can sand the edges for a smoother finish or apply a final coat of resin for added depth and protection.
- Step 11: Display and Enjoy: Once your resin artwork is complete, display it proudly in your home or studio. Whether it’s a vibrant abstract piece, a functional tray or coaster, or a delicate jewelry piece, your resin creation is sure to garner attention and admiration.
Remember to practice patience and experimentation as you explore the world of resin art. Each piece is a unique reflection of your creativity and craftsmanship, and the possibilities are truly endless!